
If you have a two year old, you know how picky these little ones can be when it comes to meals! A lot of toddlers this age have food aversions, texture issues, and will simply refuse to try new foods. This is pretty normal for the most part. But normal doesn’t mean it isn’t frustrating for us parents!
I’d always imagined that when my little one turned two I’d be preparing whimsical breakfasts with an array of fruits and vegetables, pancakes and breads and that she would squeal in delight and devour the entire plate. Unfortunately, that is not the case! My toddler controls my cooking and decides the menu for herself! And you know what? At this age that is totally OK.

Toddlers are learning about tastes and textures and may have to try a certain food up to six times in order to really get used to it being part of their menu. It’s important to offer new flavors and textures, but don’t get discouraged when these foods are refused. Instead, be optimistic and play off the child’s preferences. For instance, my little girl loves a crunch so I can make sure her vegetables and snacks are crunchy and therefore be certain that she’ll get her recommended calorie intake and be snacking healthy.
Kids grow fast, and eventually she’ll be trying all sorts of foods. But for now we’re sticking with the healthy basics. And today I’ll share some of the ideas and recipes that have worked well for this mama and her two year old, with you!
1. Sweet Potato Chips

I mentioned above that my daughter likes a crunch and isn’t super fond of soggy mushy foods, even though she loved her purees when she was a baby. On days when all of the food I prepared for her ended up on the floor, I gave up and gave in and gave her some Lays chips. I know… Anyway, she definitely enjoyed the taste, but they were too oily and greasy for her tummy and she ended up feeling a little nauseas. I felt awful and realized that I can control exactly what I want her to consume if I’m the one cooking it.
Sometimes you just need a little nudge to creativity. And so we began baking chips! And it was so easy, it’s hardly called “cooking”. The incredible thing was that I could purchase fresh produce and make crunchy healthy chips out of these veggies and that she would actually LOVE these chips!
This recipe is for sweet potato chips, but I’ve tried this with several other foods like butternut squash! My daughter’s favorite purees when she was a tiny tot was butternut squash. So I tried out this recipe with fresh butternut squash and it was a hit. Don’t forget that you’re not limited to just veggies. My daughter wasn’t big on most fresh fruits, but when baked or dried she would devour them. You can use apples, strawberries, peaches, apricots. The possibilities are endless.
What You’ll Need:
4 Sweet Potatoes
2 Tbsp Coconut Oil
Sea Salt (optional)
Preheat your oven to 375 degrees Fahrenheit. Sliced the sweet potatoes very thinly by hand or with a mandolin (preferred method). Using a mandolin can ensure that the slices are all the same thickness and therefore cook evenly. Once you have sliced the sweet potatoes, put them into a large ziplock baggie, toss in 2 tablespoons of coconut oil, close the bag and shake so that all chips are covered in the oil.
Next arrange the chips on a pan and sprinkle with sea salt. My daughter loves salty chips, and while too much sodium is not recommended, a little salt goes a long way! Be sure that your chips are not overlapping, otherwise those pieces will not turn out crunchy and we want that crunch! Bake in 375 degree oven for about 20-25 minutes. Serve with homemade guacamole, ketchup, any other sauce your toddler loves- or plain! My daughter crunches them plain!
2. Banana Nut Muffins

What’s better than naturally sweetened banana muffins for breakfast? Well how about that these are a breeze to make and freeze well also! My daughter also loves these muffins when we’re on the go, taking a walk or playing at the park. Healthy snacks like these muffins are easy to pack and go.
Toddlers can sometimes have aversions to certain textures. I can’t emphasize this enough. Because if you’re like me and have struggled to find healthy nutritious meals for your toddler, you must play around with textures and tastes and find what’s right for your little one. I’ve found my two year old loves bread-like textures (thanks mama), and she’s loved these banana nut muffins since she was about one year old.
The crunch from the almonds is a fun little surprise, and the sprinkle of cinnamon adds a warmth like no other. Cinnamon is actually such a delightful ingredient, when combined with fruits such as bananas it just tastes brilliant. These muffins are made with whole wheat flour, old fashioned oats, and naturally sweetened with honey! Trust me, your toddler will be asking you to make these on a regular basis, and you won’t feel guilty for serving these because they’re so darn healthy! If you’re trying to lose those last couple of postpartum pounds like me, these muffins are a great. Seeing as how I crave bread like every second of every day, these muffins are just what I need to curb my temptations.
What You Need:
1 3/4 cups whole wheat flour
1/4 cup old fashioned oats
3/4 cup organic honey
3 ripe bananas
2 eggs
1/4 cup milk
1 tsp vanilla extract
1/4 cup extra virgin olive oil
1/2 tsp salt
1 tsp cinnamon
1 tsp baking soda
1/4 cup almond slivers
You’ll need to start off by preheating your oven to 325 degrees. This recipe makes 12 muffins. You’ll need a large bowl, so start off by whisking the eggs. Add the honey and extra virgin olive oil into eggs and whisk. Now mash your bananas and add to the mix. Add milk, vanilla extract, salt, and baking soda.
Now add in the whole wheat flour and old fashioned oats. Fold in the almond slivers at the end. There are endless possibilities of additional goodies to add in the end like dried fruit, chocolate chips, and other nuts.
Again, this will yield 12 muffins so distribute the batter equally into muffin tin. Bake in preheated oven for about 25 minutes. Breakfast is ready!
3. Homemade Apple Waffles

Here’s another fun toddler breakfast idea that my little one loves! Homemade anything tastes better than store bought. Now that doesn’t mean I never find myself in the frozen section of a grocery store. But if time is the reason you’re concerned about making homemade waffles, this recipe will change your life!
Made with a couple great ingredients, this recipe is quick and simple. And while pancakes and crepes and other breakfast goodies require a watchful eye on the skillet, these apple waffles do not! So take that extra time to brew some coffee (for yourself, not that kids would ever require an energy booster of any sort!) unload the dishwasher, whatever you do in your morning routine.
What You Need:
1 cup whole wheat flour
2 tsp baking powder
2 tbsp brown sugar
1 tsp salt
1 cup almond milk (or whole milk)
2 eggs
3 tbsp butter (melted)
1 container of apple sauce (or 1 grated apple)
No preheating, no heating up oil in a pan! Start with the dry ingredients first by adding them to a bowl and mixing. Create a pit in the center of the dry ingredients. In a separate bowl, combine eggs, milk, and melted butter and whisk until blended. Pour the wet ingredients into the pit of the dry ingredients and fold. Now you may fold in the apple sauce, or grated apple.
With this recipe you can easily use substitutions. Want to make pear waffles instead? Use pear purées. Blueberry, strawberry, zucchini, butternut squash- truly the possibilities are endless!
Just add batter to your waffle iron, and let it do all the work. Usually it takes roughly 5 minutes to cook. Your toddlers will LOVE these homemade apple waffles! You may top them with fresh fruits, or perhaps some homemade whipped cream…on special occasions!
4. Roasted Butternut Squash Bites
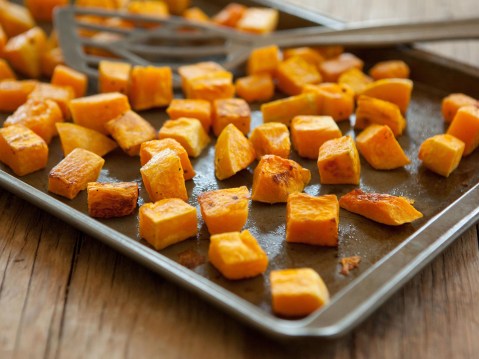
As I mentioned previously, my daughter loves butternut squash, regular squash and zucchini. However she’s not a fan of mushy textures so roasting the veggies is my go to way to ensure she loves these bite sized vegetables.
What You Need:
1 butternut squash (peeled, seeded, and cubed)
2 tbsp extra virgin olive oil
2 tsp salt (optional)
Peel and chop the butternut squash into bite sized cubes. This size works well for using hands or utensils. Preheat your oven to 400 degrees and in a large bowl cover butternut squash cubes with salt and extra virgin olive oil.
Lay parchment paper on a sheet pan and add butternut squash cubes. Make sure to keep the cubes relatively same in size to ensure equal cooking. Bake in 400 degree oven for about 25-30 minutes. You may serve these as they are, as they are super flavorful, or you may add Greek yogurt on the side, and some fresh fruit.
5. Whole Wheat Cheese Quesadilla

When my tot was about 1 years old, we had a pretty small menu of foods that she’d let us feed her. She loved purées vegetables, yogurt, among other foods. However sometimes it was tricky to get her to eat what we were eating at the table ourselves.
One night I made these whole wheat cheese quesadillas and tore them into small bite sized pieces when they had cooled down, and served it to my daughter. Well, she loved it! And it was a step to getting her used to more “normal” table food. You just gotta find something they’ll love and roll with it!
What You Need:
Whole wheat soft tortillas
Grated mozzarella cheese
Mayonnaise
Olive oil
I like to use a griddle to cook quesadillas, but one is not necessary. In a way, these are sort of like the grilled cheese version of a quesadilla, hence the mayonnaise. I love to use small whole wheat tortillas because they are so fun!
Warm up olive oil in the griddle, spread mayo on one side of tortilla and put the tortilla on the griddle mayo side down. Add mozzarella cheese and cover with another tortilla, spreading mayo on top. Once browned, flip over and cover with a lid from a pot.
Once the cheese has melted and the tortilla has browned, transfer to a plate and cut into whatever pieces your child would prefer whether it’s triangles, squares, or cut outs. Dinner is served!
